On windows when you will try to display \033[0m or \x1B[31m and so one, instead of getting color in terminal you will get ]31m. On windows 10 and letter it’s pretty easy to fix. You just need to include next code:
1
2
3
4
5
6
7
8
9
10
11
#include <windows.h>
HANDLE hConsole = GetStdHandle(STD_OUTPUT_HANDLE);if(hConsole){
DWORD consoleMode;
GetConsoleMode(hConsole, &consoleMode);
SetConsoleMode(hConsole, consoleMode | ENABLE_VIRTUAL_TERMINAL_PROCESSING);}
// now you can use color printf()
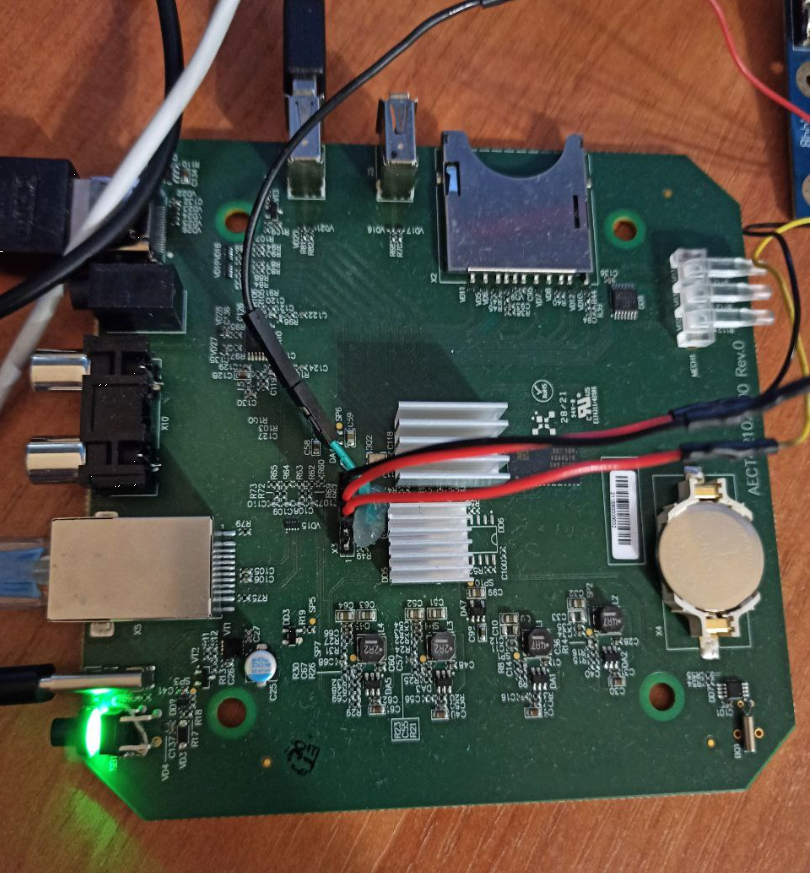
One of the previous projects was related to bringing up our newly developed board with the AmLogic s805x SoC CPU board. I will describe how the proccess of bringing up looks like, what was tested and also we will take a look how the AmLogic board flashing proccess is carried out for GXL platform (G12B and more recent are very similar).
This is our board:
Our developed Z8 board with AmLogic s805x SoC
The first stage of bringup is to build image for reference board. Our case is p241. We took a113 sources for this. Build p241 reference sources:
Build image
1
2
3
4
5
6
7
# You need arm-linux-gnueabihf-gcc and aarch64-linux-gnu-gcc to be installed in system toolchains$ sudo apt-get install zlib1g zlib1g-dev
$ source buildroot/build/setenv.sh
# Choose “mesongxl_p241_32_kernel49” // 37$ ln-s aml-4.9 kernel/aml-3.14
$ ln-s aml-4.9 hardware/aml-3.14
$ make
After the proccess in complete everything will be at output/mesongxl_p241_32_kernel49/images with folowing parts:
For example you install new compiler or MinGW C++ and you met error of _zst28__throw_bad_array_new_lengthv after compile time. You can verify you compiler with simple example:
1
2
3
4
5
6
7
8
9
10
#include<iostream>
#include<vector>usingnamespacestd;intmain(void){vector<int>a={2,0,1};// problem linecout<<"hellow world";return0;}
If you still get error on such simple example you have system libstd++ missmatch. Your system is taking this library from some other part of the system (NOT from compiler directory) of the %PATH% location. Edit you PATH variable and make compiler directory (for example: c:\mingw64\bin) to be ABOVE the problematic one. Or with other words: compiler directory must have more priority. Very popular problematic place is git - C:\Git\mingw64\bin, move it to the end of %PATH%.
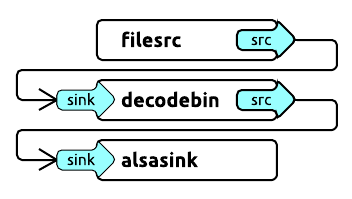
Before proceeding to code review, let’s look at what we can do without it. GStreamer includes useful utilities to work with, in particular:
gst-inspect-1.0 will allow you to see a list of available codecs and modules, so you can immediately see what will do with it and select a set of filters and codecs.
gst-launch-1.0 allows you to start any pipeline.
GStreamer uses a decoding scheme where a stream passes through different components in series, from source to sink output. You can choose anything as a source: a file, a device, the output (sink) also may be a file, a screen, network outputs, and protocols (like RTP).
Simple example of using gst-launch-1.0 to connect elements and play audio:
The input accepts the mp4 file, which goes through the mp4 demuxer — qtdemux, then through the h264 parser, then through the decoder, the converter, and finally, the output.
You can replace autovideosink with filesink with a file parameter and output the decoded stream directly to the file.
Programming an application with GStreamer C/C++ API. Let’s try to decode
Now when we know how to use gst-launch-1.0, we are doing the same thing within our application. The principle remains the same: we are building in a decoding pipeline, but now we are using the GStreamer library and glib-events.
We will consider a live example of H264 decoding.
Initialization of the GStreamer application takes place once with the help of
After a long thought, I finally decided to switch my blog articles to english, and continue to give some rare and mostly unintresting info in free form. And today we will talk more about Android, NDK and some undocumentated video/audio functionality, maybe will discover some new knowlage about AAC and maybe it will help your own problem, like it was for me.
In a focus of this acrticle is Android AAC decoder, and a little detail how the decoding in android working behind NDK documentation.
AMediaCodec using steps
First let take a very very surface look how to start decoding using NDK:
Create AMediaCodec using codec name.
Configure AMediaCodec via AMediaCodec_configure.
Ctart decoding AMediaCodec_start.
Give a buffer using AMediaCodec_getInputBuffer.
Back buffer with AMediaCodec_queueInputBuffer.
Repeat while you have an buffer ;).
Looks very simple, and work good as well. I can end this article in this place, but I don’t tell you nothing about buffer requirenments and other stuffs, and in NDK/SDK also all simple like that. So what going on behind this android decoding? What if you getting some error with your buffer, or you don’t have sound in some rare cases? How the Android decoder works like, let take a look at AAC audio decoder as example. Let’s begin from simple.
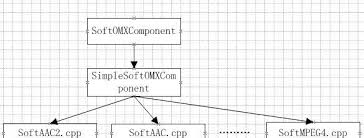
Android AAC decoder architecture
As you see on this bad jpeg picture :) Android have different implementation of AAC decoders as OMX components. But that’s not all, beside some software implemetation on some platforms existed hardware implementation, like on Broadcom chips. Keep at mind, and will transport to SoftAAC2 decoder. Let take a look deeper.
In some cases you want close the window on windows with ctrl+c combination, or invoke event for different reasons. On windows you can make such small program:
#include<windows.h>
#include<stdio.h>intmain(intargc,char*argv[]){intpid=atoi(argv[1]);printf("kill in console %d",pid);FreeConsole();if(AttachConsole(pid)){SetConsoleCtrlHandler(NULL,true);GenerateConsoleCtrlEvent(CTRL_C_EVENT,0);FreeConsole();SetConsoleCtrlHandler(NULL,false);}return0;}
As argument you can pass a pid or the window proccess. (You can get it via system monitor).
What I often dislike about the standard documentation for many things is that seemingly identical items are separated by a huge layer of unnecessary information, or are generally so poorly documented that it’s faster to find the answer on Stack Overflow. So, if we know what Electron is, and roughly imagine that it consists of a main process controlled by node-js and a browser process (the so-called render process), how do we organize communication between 2 processes?
Main process communication -> Render process (from main to render)
1
2
3
4
5
6
7
8
9
// main.process.js - send// mainWindow - this is BrowserWindowmainWindow.webContents.send('message',data);// отправка// render.process.js - reciveimport{ipcRenderer}from'electron';ipcRenderer.on('message',(event,data)=>{// handle});
Communication between Render process -> Main process (from render to main)
Why it was so difficult to collect this information in one place I don’t understand at all.
There is also a useful shared global object that is available inside the renderer and is declared in the main process.
Hello everyone this is my updated blog page. Here I will post my post about programming (C/C++/Java/Python), music engineering and other life stuffs. So everyone are welcome.